Command Basics
This page contains the basics behind HASS.Agent's commands: what they are, how they function and how you can use them. We'll be using the abbreviation HA for Home Assistant, so when HA is mentioned, it refers to your Home Assistant instance.
You can use Home Assistant's glossary to look up words you don't know yet.
Intro
From within HASS.Agent you can create commands. These are entities that will be automatically added to HA. You can use these commands to control your PC from within HA.
Tip: if you want to get data from your PC to HA, you can use HASS.Agent's sensors.
Commands can be different entity types:
- Button
- Light
- Lock
- Siren
- Switch
Your command is always handled the same way by HASS.Agent, regardless of the type your selection. The type is only relevant for HA: it determines as what type it'll show up. But they all have the same functionality.
Creation
Throughout this page, we'll be working with an example command: the Lock command. This can be easily tested (your session will get locked, hard to miss!) without accidentally shutting down your pc or something like that.
First, open HASS.Agent's main window, and click the commands button:

Note: Don't be alarmed if the system status for
commandssaysstopped: that's just because you probably don't have any commands configured yet.
You'll be shown a (possibly empty) command list:

Click the add new button to begin creating a new command.
Tip: want to modify an existing command? Just doubleclick it!
You can see the different command types on the left. Select Lock to begin configuring your lock command:

We'll pick Button as our entity type. HASS.Agent will try to generate a name for you, in this case test-vm_lock, but feel free to change that to anything you like.
The names need to be unique! That's why it's a good idea to start with the name of your pc. That way, if you install HASS.Agent on multiple pcs, they won't clash.
If you like, you can click through the command types on the left, and read their descriptions. This way you'll get a feeling for what's possible.
Missing a command? Open a ticket on GitHub with your idea!
When you're ready, click the store command button to continue.
At this point, your command isn't yet sent to HA, and it isn't even stored locally on HASS.Agent. So if you made a naming or type mistake, just doubleclick your command to edit.
Your commands config window will now have at least one command:

The columns on the right indicate action and low integrity, those are a bit more advanced and aren't relevant now.
Satisfied with your new command? Go ahead and click store and activate commands.
Your command is now sent to HA, and stored locally. Awesome!
Usage
Let's look up our new command in HA. There are multiple ways to do this, but for now we'll look up our pc (an easy way to see all sensors/commands).
Go to your HA instance, and press c. This will show the search bar. Now type devices and press enter. In the Search devices bar that's shown on top, type the name of your HASS.Agent instance:

Tip: you can always find (and change) the name of your HASS.Agent instance by clicking on the
configurationbutton in the main window.
If your HASS.Agent is properly configured, your pc will now show as a result. You can easily verify it's a HASS.Agent instance by confirming it says LAB02 Research under the Manufacturer column.
Click on your pc to see what commands and sensors are configured. It should at least show our new command:

If you can't find your device, or can't find your command, something's off in your HASS.Agent configuration. Feel free to post your problem on the HA forums. The more info you can provide, the better, but if you don't know how don't worry - we'll help.
Let's go nuts and just click it to see if it works. Did your pc get locked? Great success! If it didn't, please refer to the note above.
Implementation
Alright, so now you have a working button. There are roughly two ways you can use it: add it to your dashboard, so you can manually click it, or add it to an automation or script so HA will trigger it for you.
Adding it to your dashboard is easy. Just click on the ADD TO DASHBOARD text:

You can now choose which dashboard. When you click NEXT, HA will suggest a card for you. You can either pick a different one, or click ADD TO DASHBOARD to add it.
When you go to your dashboard, it should now show your button:

Go ahead and click it, to make sure it works :)
Let's now add it to an automation. Go back to your device's page, and on the right, click on the + sign next to Automations:

You can choose what type of automation you want. Let's pick When something is triggered..., click the button below it.
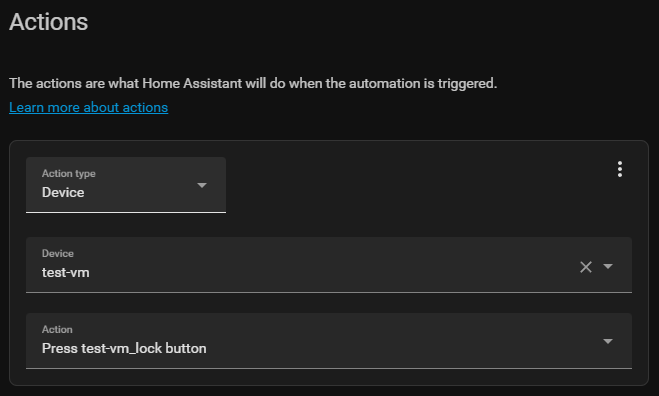
When you scroll down, in the Actions section, you'll see your button added:
Configurating automations is beyond the scope of this manual, and there are lots of good tutorials online. Just remember that you can use this action to trigger your command!
YAML
If you're into yaml, you can also easily trigger your command from there. Here's an easy example automation:
- alias: tests - trigger hassagent lock pc
  initial_state: true
  mode: single
  trigger:
    platform: state
    entity_id: input_boolean.test_vm_lock_pc
    to: "on"
  action:
    - service: button.press
      target:
        entity_id: button.test_vm_lock
    - delay:
        seconds: 2
    - service: input_boolean.turn_off
      data:
        entity_id: input_boolean.test_vm_lock_pc
The trigger is when an input_boolean gets enabled. This is pretty useless, but it allows for easy testing. When the input_boolean triggers (its state changes to on), HA will trigger our button:
    - service: button.press
      target:
        entity_id: button.test_vm_lock
The service is what you want HA to do: press our button. The entity specifies which button: our test_vm_lock one.
If you configured your command to be something else than a button, you need to set the service accordingly. If for instance you made it a switch, you'd trigger it like this:
    - service: switch.turn_on
      target:
        entity_id: switch.test_vm_lock